It’s never too early to start planning a ghostly get-together! Count down to Halloween with the October issue ofWoman’s Day, now on newsstands nationwide. Full of recipes and family friendly activities, your fall will be jam packed with seasonal fun. Keep autumn spook-tacular and stress-free with charming pumpkin carvings, DIY front-door decorations, and wickedly delightful recipes! Be sure to take note of these simple, budget-friendly, fun-filled ideas to be the spookiest house on the block.
Halloween Crafts and Recipes
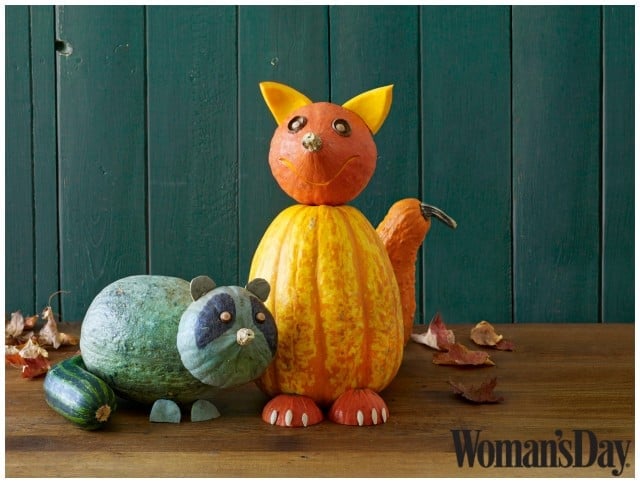
 Fantastic Fox:
Start with an oval-shaped variegated squash for the body, a teardrop-shaped orange pumpkin for the head and a long, bell-shaped orange gourd for the tail. Attach them with skewers, centering the stem of the pumpkin as the nose. Etch out a smile and hollow holes for eyes. Layer a small acorn top as eyeballs; glue in place. Quarter a small pumpkin for feet, gluing on pumpkin seeds as claws; use the rest to cut out pointy ears. Attach all to the body with skewers.
Complete the family with a curious raccoon, adorable turtles, and a playful porcupine.

Plant People:
Pick two stout pumpkins. Cut off the tops and hollow them out. Draw a face on each with a washable marker; carve. For hair, use plants like grass tuffs or ivy. Wrap each plant pot in a section of orange plastic tablecloth; hide it inside the pumpkin.

Happy Haunters:
Choose three butternut squashes of varying lengths. Trim ¼” off the larger end; hollow out and cut a zigzag along the bottom. Draw on faces with a washable marker; carve. Inside each, make a simple platform with skewers to hold a tealight.
 Smashed Witch:
A witch crashed on her search for candy! Recreate this eye-fooling idea with hardware store finds (brooms, spray paint), party store picks (the witch’s costume, plastic cauldrons, a black cat) and craft supplies (batting for the bubbles, construction paper for the mice cutouts, ribbon to trim the brooms). Make sure to secure the witch so she’s nice and flat-better to give a funny “splat!” effect.

No-Bake Peanut Butter Cup Cheesecake:
Perfect for peanut butter and cheesecake lovers alike, this no-bake dessert contains a hidden layer of Reese’s cups and is topped with Reese’s pieces.
Serves: 10
Total Time: 2 hr 15 min
Prep Time: 15 min
ingredients
- (Cooking spray) for the pan
- 1 package(s) (9-ounce) chocolate wafer cookies (we used Nabisco’s)
- 1/2 cup(s) (1 stick) unsalted butter, melted
- 1 1/2 package(s) (8 ounces each) cream cheese
- 1 cup(s) heavy cream
- 1 teaspoon(s) pure vanilla extract
- 17 peanut butter cups (we used Reese’s)
- 2 ounce(s) Reese’s pieces, roughly chopped
directions
- Lightly coat a 9-inch spring form cake pan with cooking spray.
- In a food processor, pulse the chocolate wafers to form fine crumbs. Add the melted butter and pulse to combine. Press the crumb mixture into the bottom and 2 inches up the sides of the pan and refrigerate until ready to use.
- Meanwhile, using an electric mixer, beat the cream cheese and sugar until smooth. Reduce the mixer speed to low and gradually add the heavy cream, mixing just to incorporate. Increase the speed to high and beat until thick and stiff, about 2 minutes.
- Arrange the peanut butter cups on the bottom of the prepared crust, breaking them to fit, as necessary, to fill any large gaps. Spread the cheesecake filling over the top of the peanut butter cups and sprinkle with Reese’s pieces. Refrigerate for at least 2 hours and up to overnight.

Chocolate cookie walls and candy decorations make this haunted house frightfully delicious.
Windows – Attach windows to house with royal icing, then affix candy eyeballs ($3.99, wilton.com) to windows with melted hard caramel.
Stairs – Cut 3 wafer cookies to the width of the door, and arrange as stairs.
Shingles – Starting with the top row, stick Golden Graham Cereal shingles on the roof using melted hard caramel.
Headstone – Cut the bottom third off a Milano cookie and pip RIP on the top using tinted royal icing.
Dirt – In a food processor, pulse 6 chocolate cookies (such as Famous Wafers) until they’re fine crumbs.
Paved Ground – Make a path to the front door with white M&M’s; attach to the cookie base with royal icing. Stick gray, black, lavender and purple M&M’s around the house.
Spiders and Web – Affix mini M&M’s to the walls using royal icing. Then pipe royal icing legs and eyes and draw a web.
Recipes and Photo Credit provided to A Sparkle of Genius by Woman’s Day.
Photo Credit: Pumpkins: Antonis Achilleos; Smashed Witch: Jonny Valiant; Haunted House: Emily Kate Roemer

Hi, my name is Melissa! I live in Spanish Fork, Utah. I’m happily married to Rob, and together we have five wonderful kids. Our family loves to embark on adventures, often in our RV, exploring the great outdoors. I’m an avid reader and a big fan of Hallmark movies – they always have a way of lifting my spirits. Hiking is another passion of mine; there’s nothing like the tranquility of nature. I have a sweet tooth for chocolate and a love for Mexican food, both of which make life a little more delicious. In my downtime, I enjoy playing games with my family, creating memories and sharing laughter. Life is an adventure, and I’m here to enjoy every moment of it! I’m the blogger and creative mind behind the blog A Sparkle of Genius! Check out our posts on recipes, crafts, kid stuff, printables, travel and more!

