
The holiday season is slowly creeping in, and with it comes the excitement of welcoming back our favorite elf visitors from the North Pole. It’s that magical time of year again, where scout elves grace our homes with their mischievous antics, heralding the onset of the Christmas season. But before we get swept up in the festivities, it’s essential to prepare a warm welcome for our little helpers. One fabulous way to herald their arrival is by gifting them something special. So, if you’re seeking creative “elf on the shelf arrival gift ideas”, you’ve stumbled upon the right place!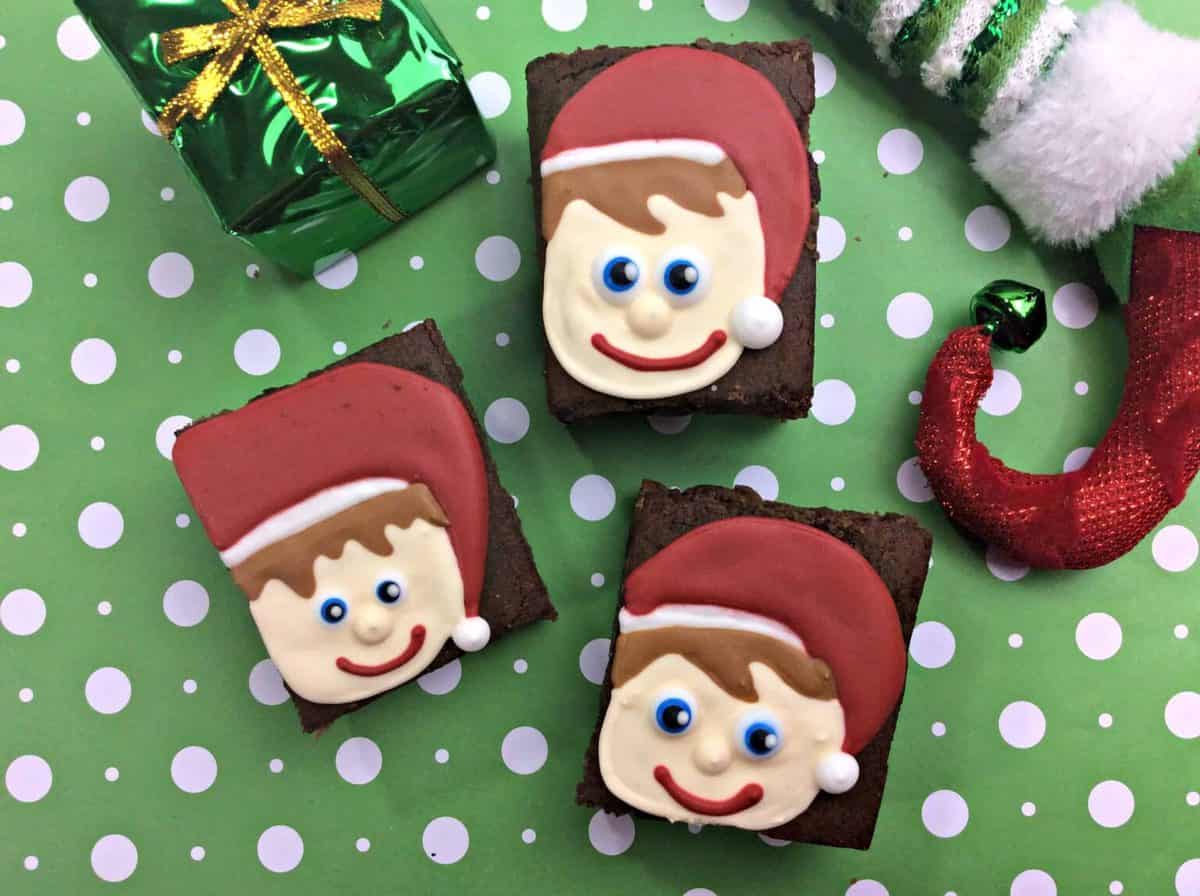
Kicking Off the Festivities with Elf on the Shelf Brownies
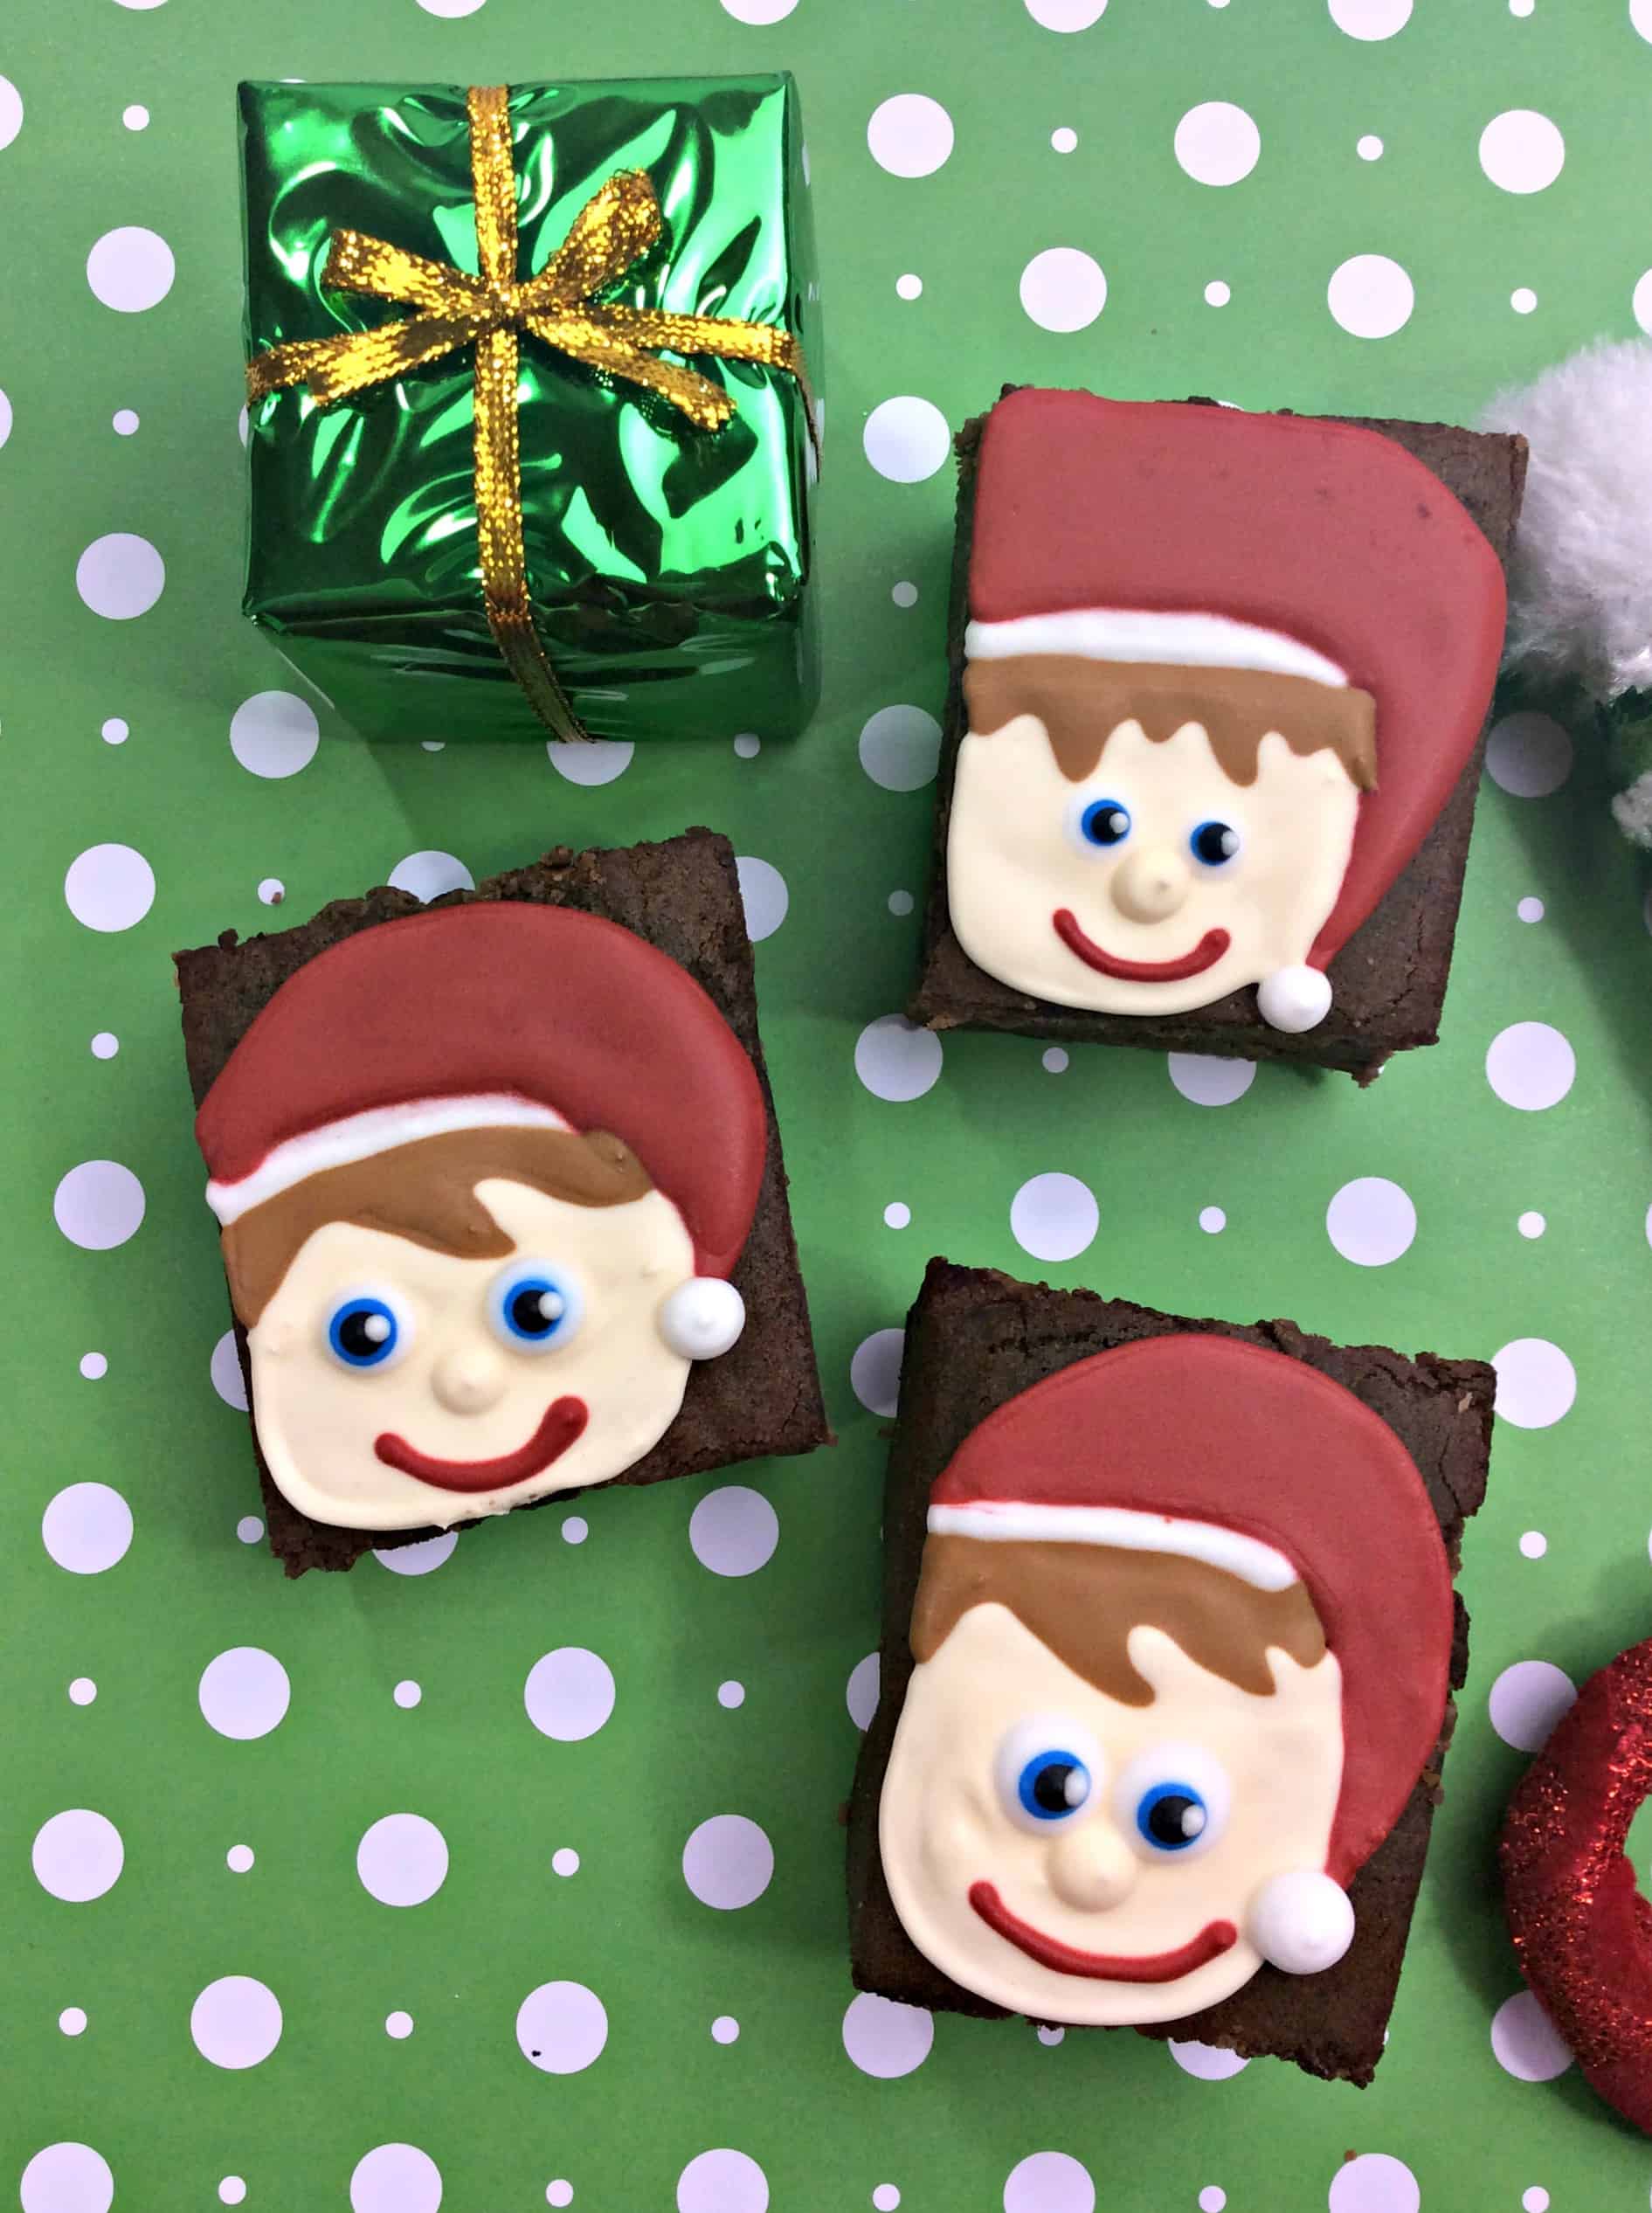
My kids are counting down the days until their Elf on the Shelf comes back. It is our family Holiday Tradition to start Christmas season with a treat and the Elf on the Shelf Welcome letter (print it here). This year they will be getting a delicious holiday treat with this Christmas Elf Brownie. Not only is it adorable but it is delicious! Your kids will be so excited and grinning from ear to ear with this adorable Christmas Elf treat.

Starting off the month of December with a delightful treat is a tradition that never goes out of style. This year, why not welcome your adorable elf with a plate of freshly baked, homemade Elf on the Shelf brownies? Here’s a simple recipe that will make your elf’s arrival day even more memorable:
Ingredients:
- Brownies:
- 1 Cup unsalted sweet cream butter, softened
- 2 Cups sugar
- 3 large eggs
- 2 tsp vanilla
- 2/3 Cup unsweetened Hershey cocoa powder
- 1 Cup flour
- 1/2 tsp salt
- 1/2 tsp baking soda
- 1 9×13 baking pan fitted with parchment paper
- Royal Icing:
- 3 egg whites
- 2 Cups powder sugar
- 1 tsp vanilla
- 1/2 tsp cream of tartar
- Red, brown, blue, black, and ivory gel food coloring
- 6 disposable piping bags fitted with a #2 tip
- 5 bowls to mix colors in
Directions
- Preheat your oven to 350 degrees.
- Using a large sauce pan, melt butter. Once melted remove from heat and mix in the sugar, eggs and vanilla until combined.
- In a large bowl combine the cocoa, flour, salt and baking powder.
- Gradually mix in the cocoa flour mixture into the wet ingredients until combined.
- Pour batter into the baking dish and bake for 30-35 minutes. Ten cool to room temperature.
- Cut brownies into squares and place onto a cutting board or plate so that it will be easier to decorate.
Royal Icing for Elf on the Shelf Brownies Directions:
- Using the standing mixer, combine the egg whites, cream of tarter, powder sugar and vanilla and mix on medium speed until stiff peaks form.
- Split the icing into 5 bowls, leaving some left to go into the 6th piping bag.
- In the first bowl, add in a few drops of red coloring, mix until combined. Add in some more food coloring to get the shade you want.
- In the second bowl, add in a tiny amount of ivory gel coloring to get a skin tone color.
- In the third bowl, add in a few drops of blue and mix until combined.
- In the fourth bowl, add in some black and mix until combined.
- In the fifth bowl add in some brown and mix until combined.
- Using the remaining white icing in the mixing bowl, scoop the icing into a piping bag and set aside.
- Scoop the colored icing into each of their own bags. You should have 6 total piping bags.
Crafting these brownies is a fun and engaging way to usher in the Christmas spirit, making it an exciting event for both kids and adults alike. Plus, what better way to welcome your elf on the first visit than with a plate of delightful, elf-themed brownies?
Decorating Elf on the Shelf Brownies directions:

Using the red piping bag, pipe a line for the elf hat.

Using the white piping bag, pipe a line under the bottom part of the hat.

Using the brown piping bag, pipe the hair under the hat.

Using the ivory piping bag, pipe a circle for the face. Fill in all lines with their respective colors. Using the white, pipe a dollop of white at the end of the hat.
Pipe two dots in the middle of the face for the eyes. Pipe two blue dots in the middle of the eyes. Pipe two black dots for the pupils followed by two small white dots. Pipe a red line for the smile. After decorating, wait for 30 minutes for the icings to dry before piping an ivory dot under the eyes for the nose. Let dry for an hour before enjoying!

10 Other Elf on the Shelf Arrival Gift Ideas
In addition to the mouth-watering brownies, here are ten more elf on the shelf arrival gift ideas that would certainly please your little elf:
- Hot Air Balloon ArrivalWelcome your favorite elf with a grand entrance by having your elf arrive in a mini hot air balloon. This could be a DIY project involving a small basket and a helium balloon, adorned with little treats and twinkling Christmas lights, making it a spectacular sight near your Christmas tree.
- Scavenger HuntEngage the kids with a fun scavenger hunt that culminates in the discovery of the new elf guest. Place little clues around the house that lead them to the next hint, creating an exciting morning of exploration and discovery, fostering the Christmas spirit right from day one.
- Personalized Elf DoorCraft a small, personalized elf door that serves as a magical gateway from the North Pole. This new spot will be where the children can find the elf each morning, tucked away in a cozy nook, adding to the magic of the Christmas season.
- Christmas Lights ShowKickstart the festivities with a mini Christmas lights show in your living room, turning it into a magical spectacle for the elf’s arrival day. Let the room glitter with twinkling Christmas lights and melodious Christmas carols, creating an enchanting atmosphere that brings the North Pole to your home.
- Elf Movie NightSet up a mini movie theater with Christmas movies playing to entertain your elf on their first day back. Create a snug corner with comfy cushions, popcorn, and a selection of Christmas movies that the entire family can enjoy together, fostering a warm and cozy atmosphere.
- Craft CornerPrepare a craft corner with materials for the kids to make elf accessories and decorations. This can be a fabulous elf workshop where children can create elf hats, shoes, and various other items, encouraging creativity and adding a personal touch to the elf’s new home.
- Advent CalendarsIncorporate an advent calendar as part of the elf’s arrival, where each day unveils a small gift or a clue leading to the next elf mischief. It’s a great way to build anticipation and keep the kids engaged throughout the month of December.
- Elf Welcome BreakfastHost an elf welcome breakfast on the next morning of the elf’s arrival. Have a special menu with themed foods and a place setting for the elf, making the first day back a grand celebration filled with delightful treats and laughter.
- Elf Reading CornerCreate a reading corner with the Elf on the Shelf book and other Christmas storybooks. This quiet spot can be a place where the kids can read about the adventures of elves, fostering a love for reading and a deeper connection with the elf tradition.
- Elf’s Arrival ParadeOrganize a mini parade in your living room to welcome the elf back home. Let the children craft little flags and banners for the parade, making it a lively and fun tradition that heralds the beginning of a magical season.
Key Takeaways
- Bringing Christmas to Life
- Building Anticipation: Start building the anticipation early on with clues or little treats leading up to the elf’s arrival. This can turn the entire month of December into a joyful adventure.
- Fostering Family Bonds: Crafting these arrival scenes or preparing the gifts together as a family can forge stronger bonds and become a cherished memory for the children.
- Creative Involvement
- Stimulating Imaginations: Encouraging children to think of new ways their elf might arrive can stimulate their imaginations and develop their creativity.
- Flexibility and Adaptation: Show that tradition can adapt and change, with new elf arrival ideas being welcomed and incorporated each year.
- Building Anticipation
- Adventures from the North Pole: Share little stories about your elf’s adventures in the North Pole, adding a magical narrative that builds anticipation and adds a layer of excitement.
- Interactive Activities: Create interactive activities such as drawing what they think the elf was doing before its arrival or what its first day back would be like, making the awaiting period more engaging and fun.
Frequently Asked Questions: Elf on the shelf arrival gift ideas
How can I make the elf’s arrival more magical for the first time?
- Introduce Elf’s Backstory: Craft a rich backstory for your elf, involving tales from the North Pole, encounters with Santa Claus, and adventures with reindeers, making the first visit a grand narrative experience.
- Setting the Scene: Decorate your home in a way that transports children to the North Pole, with Christmas lights, snowflakes, and other elements that set the stage for the elf’s grand entrance.
What are some last-minute elf on the shelf arrival ideas?
- Printable Letters: Utilize free printable elf arrival letters available online for a quick and personal touch.
- Elf’s Sweet Surprise: Quickly set up a small corner with candy canes and little treats accompanied by a note from the elf, creating a sweet surprise for the kids.
How to keep the Elf on the Shelf tradition fresh and exciting each year?
- Involving Kids in Planning: Each year, involve the kids in planning the elf’s arrival, letting them come up with new ideas and suggestions.
- Community Engagement: Engage with a community of other parents to exchange creative ideas, which keeps the tradition fresh and provides new perspectives.
What are some creative yet easy elf on the shelf arrival ideas for older kids?
- Elf Mission Briefs: Create mission briefs or challenges where the older kids can help the elf complete certain activities or solve puzzles.
- Elf Journal: Encourage older kids to maintain an ‘Elf Journal’ where they can document the elf’s daily activities, adding a more interactive and engaging element to the tradition.
How can I incorporate learning elements into the Elf on the Shelf tradition?
- Educational Activities: Introduce educational activities such as puzzles, riddles, or math challenges which the elf brings along from the North Pole, making learning fun and integrated into the Christmas season.
- Cultural Insights: Use the elf’s stories to introduce children to different cultures and traditions around Christmas globally, fostering a global mindset and knowledge expansion.
Elf on the Shelf Brownies

Indulge in the holiday spirit with this irresistible Elf on the Shelf brownie recipe! Featuring a decadent blend of rich cocoa and sweet cream butter, these brownies bring the enchantment of the North Pole to your kitchen. Decorated with vibrant royal icing details that capture the whimsical charm of your favorite elf, they are not just a treat to your palate but also a feast for the eyes. This recipe promises a delightful blend of fun and flavor, making it the perfect kickoff to your elf's seasonal adventures. Embrace the Christmas season with this delightful recipe, where every bite is a sprinkle of magic and a dash of Christmas joy.
Ingredients
- 1 Cup unsalted sweet cream butter, softened
- 2 Cup sugar
- 3 large eggs
- 2 tsp vanilla
- 2/3 Cup unsweetened hershey cocoa powder
- 1 Cup flour
- 1/2 tsp salt
- 1/2 tsp baking soda
- 1 9x13 baking pan fitted with parchment paper
- Royal icing
- 3 egg whites,
- 2 C powder sugar
- 1 tsp vanilla
- 1/2 tsp cream of tarter
- red, brown, blue, black, and ivory gel food coloring
- 6 disposable piping bags fitted with a #2 tip
- 5 bowls to mix colors in
Instructions
Preheat your oven to 350 degrees.
Using a large sauce pan, melt butter. Once melted remove from heat and mix in the sugar, eggs and vanilla until combined.
In a large bowl combine the cocoa, flour, salt and baking powder.
Gradually mix in the cocoa flour mixture into the wet ingredients until combined.
Pour batter into the baking dish and bake for 30-35 minutes. Ten cool to room temperature.
Cut brownies into squares and place onto a cutting board or plate so that it will be easier to decorate.
Royal Icing for Elf on the Shelf Brownies Directions:
Using the standing mixer, combine the egg whites, cream of tarter, powder sugar and vanilla and mix on medium speed until stiff peaks form.
Split the icing into 5 bowls, leaving some left to go into the 6th piping bag.
In the first bowl, add in a few drops of red coloring, mix until combined. Add in some more food coloring to get the shade you want.
In the second bowl, add in a tiny amount of ivory gel coloring to get a skin tone color.
In the third bowl, add in a few drops of blue and mix until combined.
In the fourth bowl, add in some black and mix until combined.
In the fifth bowl add in some brown and mix until combined.
Using the remaining white icing in the mixing bowl, scoop the icing into a piping bag and set aside.
Scoop the colored icing into each of their own bags. You should have 6 total piping bags.
Using the red piping bag, pipe a line for the elf hat.
Using the white piping bag, pipe a line under the bottom part of the hat.
Using the brown piping bag, pipe the hair under the hat.
Using the brown piping bag, pipe the hair under the hat.
Pipe two dots in the middle of the face for the eyes. Pipe two blue dots in the middle of the eyes. Pipe two black dots for the pupils followed by two small white dots. Pipe a red line for the smile. After decorating, wait for 30 minutes for the icings to dry before piping an ivory dot under the eyes for the nose. Let dry for an hour before enjoying!
Conclusion: Elf on the shelf arrival gift ideas
As we inch closer to the most awaited time of the year, the return of our beloved scout elves brings with them an influx of joy and festive cheer. Crafting a heartfelt welcome with unique “elf on the shelf arrival gift ideas” ensures the spirit of Christmas envelops your home in the warmest embrace, nurturing new traditions and weaving cherished memories.
From concocting a batch of delightful Elf on the Shelf brownies to orchestrating a scavenger hunt or a magical grand entrance, the options are endless in marking the arrival of your cherished guest. These acts of preparation not only heighten the excitement but also foster a sense of joy and wonder, sprucing up the holiday season with magical moments.
So, as the clock ticks down to December 1st, let us embrace the flurry of excitement, the bubbling joy, and the infectious happiness that the Elf on the Shelf tradition brings. Let’s fling our doors open wide, ready to greet our little North Pole helpers with exuberant smiles and a plate of delightful brownies, signaling the beginning of a season filled with laughter, love, and the magic of Christmas. Let’s make this year’s Elf on the Shelf arrival a memory that will be cherished for years to come, blending the joyous spirits of tradition and innovation in the best way possible.
Here’s to a season of wonder, joy, and the creation of cherished memories with our little scout elves! Let the Christmas magic begin!
Remember, the “elf on the shelf arrival gift ideas” we craft today turn into the cherished memories of tomorrow.

Hi, my name is Melissa! I live in Spanish Fork, Utah. I’m happily married to Rob, and together we have five wonderful kids. Our family loves to embark on adventures, often in our RV, exploring the great outdoors. I’m an avid reader and a big fan of Hallmark movies – they always have a way of lifting my spirits. Hiking is another passion of mine; there’s nothing like the tranquility of nature. I have a sweet tooth for chocolate and a love for Mexican food, both of which make life a little more delicious. In my downtime, I enjoy playing games with my family, creating memories and sharing laughter. Life is an adventure, and I’m here to enjoy every moment of it! I’m the blogger and creative mind behind the blog A Sparkle of Genius! Check out our posts on recipes, crafts, kid stuff, printables, travel and more!